Intelligently Analyze and Group Burial Locations
The Burial Places Module analyzes all burial events in your family tree and groups them by locations and cemeteries with intelligent GEDCOM field detection.
Quick Start – Get Started Immediately!
- Download Module: Download ZIP file from the homepage
- Upload: Extract to
/modules_v4/burial-places-report/ - Activate: Enable in Webtrees under "Control panel → Modules → Lists"
- Configure: Click the gear icon at "Burial Places" → Adjust settings
- Use: Access via menu "Lists → Burial Places" and use filters
Intelligent
Cemetery detection in AGNC, PLAC, NOTE
Flexible
Various filter options
Exportable
CSV export with all details
1 Download
Download the module ZIP file from the homepage.
2 Upload and Extract
Extract the ZIP file to the directory:
/modules_v4/burial-places-report/modules_v4/burial-places-report/module.phpmodules_v4/burial-places-report/resources/...
3 Activate Module
- Log in as administrator in Webtrees
- Go to Control panel → Modules → All modules
- Search for "Burial Places Report"
- Activate the module by clicking the switch
4 Configure Module
- Go to Control panel → Modules → Lists
- Click the gear icon at "Burial Places"
- Select the desired family tree
- Adjust settings according to your needs
Intelligent Cemetery Detection
The module automatically searches various GEDCOM fields for cemetery information:
- AGNC (Institution) - The specialized cemetery field
- PLAC (Place name) - When keywords match
- NOTE (First line of note) - When keywords match
1. First check AGNC → 2. If empty: check NOTE → 3. If empty: check PLAC
Flexible Filter Options
Filter your burial data by various criteria:
- By burial location: Show only burials in specific places
- By cemetery/institution: Filter by specific cemeteries
- With/without cemetery information: Find missing data for data maintenance
- Sorting: Sort by location or by cemetery/institution
CSV Export
Export all burial data as CSV file with the following columns:
- Burial location
- Cemetery/Institution
- Person name
- Death date
- Burial date
- Address (from BURI → ADDR)
- Note (from BURI → NOTE)
- URL to person page
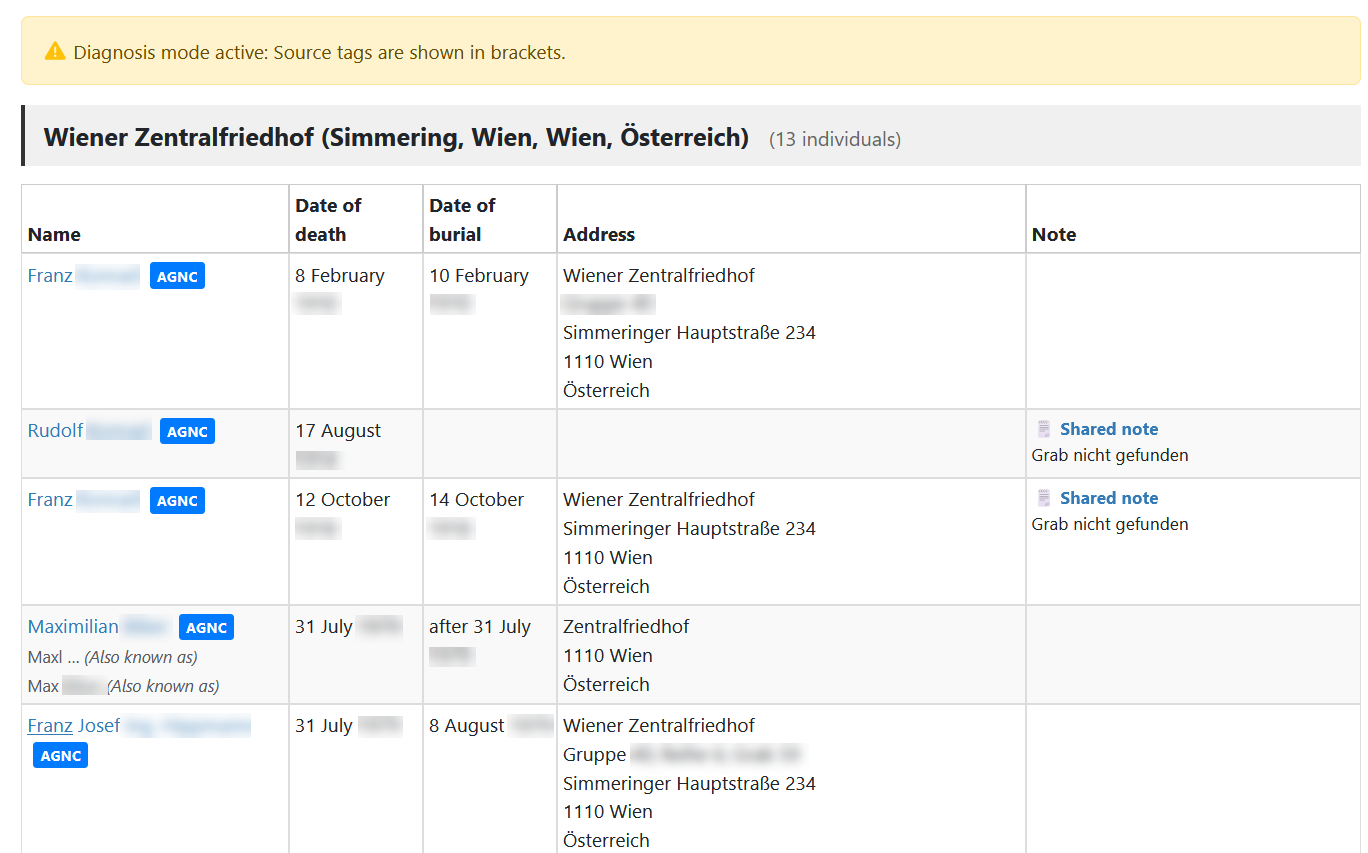
Diagnostic Mode
Activate diagnostic mode to see which GEDCOM field the cemetery information comes from:
(AGNC)- From the institution field(PLAC)- From the place field(NOTE)- From the first line of a note(NONE)- No information found
Access Settings
Open the module settings via:
Control panel → Modules → Lists → Burial Places (gear icon )
1. Cemetery Field in Event Editor
When activated, the AGNC field (institution) is always displayed in the burial editor and can be edited - even if no value has been entered yet.
2. Value Detection Sequence
Determine the order in which GEDCOM fields are searched:
1. AGNC (Institution)
2. NOTE (First line of note)
3. PLAC (Place name)
💡 Tip: You can change the order via drag & drop!
3. Cemetery Keywords
Define keywords for detecting cemeteries in PLAC and NOTE fields:
Cemetery,Friedhof,Cimetière,TemetőExample: If "Cemetery" is defined as keyword and the PLAC field contains "Vienna, Central Cemetery", then "Vienna, Central Cemetery" is recognized as a cemetery.
4. Diagnostic Mode
When activated, you see in the list which GEDCOM field the information comes from. This helps you check and optimize your GEDCOM data.
5. Reset to Defaults
With the "Reset to defaults" button, you can reset all settings for the current tree to factory settings.
Basic Usage
- Go to Lists → Burial Places in the main menu
- Optionally select filters:
- Burial location (e.g. "Vienna")
- Cemetery/Institution (e.g. "Central Cemetery")
- Only entries with/without cemetery information
- Choose sorting: By location or by cemetery/institution
- Click "Generate list"
- Results are displayed grouped by burial location and cemetery
- Optionally: Export the list as CSV file
Display of Results
The list shows:
- Grouping: By burial location and cemetery/institution
- Person data: Name, birth, death, age
- Burial date: Date of burial
- Count: How many people are buried at each location/cemetery
Using CSV Export
- Create the list with your desired filter settings
- Click the button "Download as CSV"
- The CSV file is created with UTF-8-BOM encoding (Excel compatible)
- Open the file in Excel, LibreOffice or another spreadsheet program
Module Does Not Appear in Menu
- Is the module activated? → "Control panel → Modules → All modules"
- Is the module activated as "List page"? → "Control panel → Modules → Lists"
- Clear cache (reload browser with Ctrl+F5)
No Cemetery Information Displayed
- Activate diagnostic mode in settings
- Check if your GEDCOM files contain AGNC, PLAC or NOTE fields for burials
- Adapt the keywords to your language/data
- Change the fallback sequence to search in the correct fields first
AGNC Field Not Shown in Editor
CSV Export Contains No Data
- No burials found matching the filter criteria
- Browser blocks downloads → Check popup blocker
- Server timeout with very large family trees → Use filters to reduce data volume
Too Many "Unknown" Entries
- Activate diagnostic mode - You'll see (NONE) for entries without information
- Extend the keywords with additional terms
- Change the fallback sequence
- Use the filter "Only without cemetery information" to specifically maintain missing data
GEDCOM Structure
The module works with the following GEDCOM structures:
1 BURI
2 PLAC Vienna
2 AGNC Central Cemetery Vienna
2 DATE 15 MAR 19201 BURI
2 PLAC Vienna
2 NOTE Cemetery St. Marx, Section 15
3 CONT Additional information...1 BURI
2 PLAC Vienna, Central Cemetery
2 DATE 15 MAR 1920System Requirements
| Webtrees: | Version 2.2.1 or higher (tested with 2.2.4) |
| PHP: | Version 8.0 or higher (recommended: 8.3+) |
| Browser: | All modern browsers with JavaScript enabled |
| FTP Access: | For uploading module files |
Supported Languages
The module is multilingual and supports:
Compatibility
The module works with:
- ✅ Webtrees 2.2.1 to 2.2.4
- ✅ All common themes
- ✅ PHP 8.0 to 8.3
- ✅ GEDCOM files from various genealogy programs (Ahnenblatt, Family Tree Maker, Gramps, Legacy Family Tree)
License
This module is free software and is released under the GNU General Public License v3.0.
webtrees: online genealogy

Copyright (C) 2025 webtrees development team


This program is free software: you can redistribute it and/or modify

it under the terms of the GNU General Public License as published by

the Free Software Foundation, either version 3 of the License, or

(at your option) any later version.


This program is distributed in the hope that it will be useful,

but WITHOUT ANY WARRANTY; without even the implied warranty of

MERCHANTABILITY or FITNESS FOR A PARTICULAR PURPOSE. See the

GNU General Public License for more details.
The complete license can be found at: https://www.gnu.org/licenses/gpl-3.0.html